SSIS: Exporting data to a text file using a package
Posted by decipherinfosys on July 23, 2008
On this blog, we have covered how to export data out from the database and different ways to import data into the database tables from different sources. We have covered that for all the three major RDBMS that we cover on this blog: Oracle, DB2 LUW and MS SQL Server. Sometimes, these tasks are adhoc in nature and sometimes, they need to be more repeatable in nature. In this post, we will cover how to create a SSIS package for exporting the data out to a text file in the case of SQL Server. If you are new to SSIS, see our basics sections here and here. And the details of the Execute SQL task were then covered in a series of posts that you can access here , here and here.
In order to make the process repeatable, one should create a SSIS package for the data exports that one needs to do frequently. The task we are going to accomplish in this example is to send the information pertaining to customers and the orders placed by the customers. For this purpose we are going to make use of the AdventureWorks Database in SQL Server 2005. First we are going to write a query to retrieve the information required from the database. Typically this query can also be replaced by a database view to retrieve the information from the database. That way, even if the view logic changes, your code in the SSIS package does not need to change. And if there is a need to have procedural logic in place, then you can use a stored procedure or a UDF. Here is the query which we are going to use to retrieve the required information and export it to a text file. Typically, there will be filter criterias and other conditions associated with such queries – the query in this post is just to illustrate the concept.
SELECT
c.CustomerID,Title, FirstName, MiddleName, LastName, c.AccountNumber, C.CustomerType, pa.AddressLine1,
City, StateProvinceCode, CountryRegionCode, PostalCode, SalesOrderNumber, so.AccountNumber as SalesAccountNo,
OrderDate, DueDate, ShipDate, SubTotal, TaxAmt,
Freight, TotalDue
FROM Sales.Customer c
INNER JOIN Sales.CustomerAddress a on a.CustomerID = c. CustomerID
INNER JOIN Person.Contact pc on pc.ContactID = c.CustomerID
INNER JOIN Person.Address pa on pa.AddressID = a. AddressID
INNER JOIN Person.StateProvince sp on sp.StateProvinceID = pa.StateProvinceID
INNER JOIN Sales.SalesOrderHeader so on so.CustomerID = c.CustomerID
ORDER BY CUSTOMERID
The ideal scenario would be sending the order and customer information to the client for the orders placed on the current day. For this post’s example, entire data in the database is exported to a text file and the text file would be named as ‘CustomerOrders_<mmddyyyy_HHMMSS>’. Since we are dealing with the flow of data in this example our package would require a Data Flow Task.
Creation of the SSIS Package:
Open up the SSIS designer by navigating to
Start => All Programs => Microsoft Sql Server 2005 => SQL Server Business Intelligence Development Studio.
This will open up the SSIS designer to create the SSIS package. Create the new project in the SSIS designer.
1. Creation of a new variable:
To create a new variable right click on the control flow pane and click on the Variables option. This will show the Variables window on the left. Create a new variable ‘FileLocation’ at the package level. We are going to make use of this variable to specify the location of the destination text file. We are going to make use of the location C:\SSIS in our example. The following image shows the creation of the variable.
2. Exporting the Data into the text using Data Flow Task:
Our next task is to define the data flow task which exports the data from the database into the text file pointed by the location in the variable FileLocation. Drag and drop the Data Flow Task from the Control Flow Tool Box into the Control Flow Designer. Double clicking on it will automatically take us to the Data Flow Tab of the SSIS Designer.
3.1 Configuring the Source in the Data Flow task:
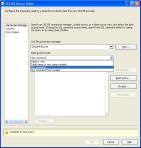
On the Data Flow tab, drag and drop the “OLE DB Source” from the Data Flow Sources in the Data Flow Tool Box. Double click on the task which opens up the editor for the OLE DB Source. Create the new OLE DB source connection manager by clicking on “New” button on the OLE DB Source Editor. The creation of the connection managers has been dealt with in detail in the earlier posts. The data access mode option in the OLE DB source editor gives us various options of retrieving the data from the database. The image below shows the various options available to retrieve the data from the database.
The various options available are:
1. Table or View:
This option allows us to choose a database table from which we are going to export the data. This option is useful only when we are retrieving the data from single table or view only.
2. Table Name or View Name Variable:
This option enables us to pass the table or view name as a variable into the SSIS Package. Again this option is useful only when we are retrieving the data from single table or view only.
3. Sql Command:
This option allows us to specify the SQL Command (even a stored procedure) to retrieve the data from the database. This is the most viable option for us to use. Since we are retrieving the data from multiple tables inside the database, we are going to make use of this option.
4. Sql Command from Variable:
This option is very similar to the above one except that we can pass the sql command through a variable.
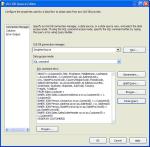
Choose Sql Command option in the Data Access Mode in the OLE DB Source Editor. It will display the space to write the sql command. Copy the sql command provided earlier in this post and paste it in here. One can use the Build Query option also to build the query. Clicking this opens a GUI to define the tables to retrieve the data from. The image below shows the configured OLE DB Source Transform in SSIS. Click OK to return to the data flow designer pane.
3.2 Configuring the Destination in the Data Flow task:
The next step in our task is to configure the destination for the data to be exported. On the Data Flow tab, drag and drop the “Flat File Destination” from the Data Flow Destinations in the Data Flow Tool Box. Drag the path (green arrow) from the OLE DB Source and join to the Flat File source . Double click on the task which opens up the editor for the Flat File Destination.
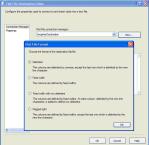
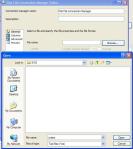
Click on New to create the New Flat File Destination Connection Manager. It will open up a dialog which asks us to select if the destination data is delimited or if the data is of fixed filed length. In our example, we will choose the Delimited option.
The image below shows the configuration of connection manager of Flat File Destination.
Click on OK and SSIS will open up the GUI for configuring the connection manager for the Flat File Destination. Rename the Connection Manager Name if required and for the File Name Option, click browse and give the destination file name. For the purpose of our example, we are using the file at C:\SSIS\orders.txt. The following image shows the configuration of Flat File Connection Manager.
Click on Open to go back to the connection Manager.
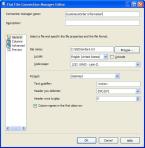
We have an option to choose the delimiter for the header row in this General Page. Choose the New Line delimiter ({CR}/{LF}) option for our example. Check the ‘Column names in the first row’ if the column names are required in the first row. In this example we are checking this option since we require the column names in the output flat file.
The following image shows the General Page of the Flat File Connection Manager.
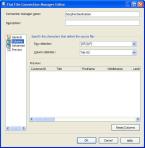
Open up the Columns Page on the Left hand side. Here we can choose the row and the column delimiter for the text file. For our example, choose the New Line as the row delimiter and the Tab{T} as the column delimiter. Click OK to go back to the Flat File Destination.
The following image shows the Columns page of the Flat File Connection Manager.
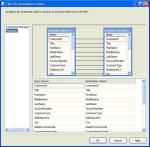
Navigate to the Mappings page on the Flat File Destination Editor and map the source columns to the destination columns. The following image shows the Source and Destination Column Mappings.
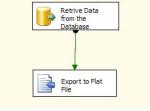
The following image shows the Data Flow task after the configuration of the source and the destination.
The following image shows the entire package for exporting the data in the database to the text file.
Execute the package by hitting F5. The executables will turn green indication the successful execution of the package. We can to go the location C:\SSIS and see that the flat file orders.txt is indeed created with the retrieved data from the database.
Now we fulfilled part of our task of exporting the data from the database to the text file. But the issue here is the name of the text file is static. Every time we run this package will overwrite the destination text file which is not what we want. Ideally, we would like to create the text file with the name CustomerOrders_<mmddyyyy_HHMMSS> or something similar to it. This means that we have to create the file name dynamically.
To do this let us go back to the control flow task and add the Script Task to our package. The configuration of the Script Task has been discussed in the earlier posts. In the script task editor, in the Script Page specify the ReadWriteVariables as FileLocation. We are going to make use of this variable to generate the full file name of our destination file. Open up the Script editor by clicking on the Design Script button on the Script Task Editor. This will open up the visual studio where we write the code to generate the file name. Copy and paste the following code to generate the new file name for our destination file based on the format described earlier.
Dts.Variables(“User::FileLocation”).Value = Dts.Variables(“User::FileLocation”).Value.ToString + “\CustomerOrders_” + CStr(Format(Now(), “MMddyyyy_hhmmss”))
This code is going to append the file name generated using the current date and time to the File Location pointed by our variable FileLocation. In this way we can also control the location in which the destination file is stored by just changing the variable value. The variables are very powerful piece of SSIS architecture. They are used to alter the properties of the package at run time.
Our next step is to tell the flat file connection manager to point to this file which we generated in the earlier step. As discussed in the earlier post, in order to dynamically alter the package at run time we have to make use of the expressions page of the SSIS executable.
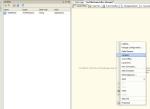
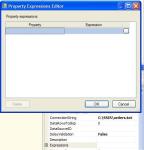
In our example, we have to open up the Expressions editor for the Flat File Connection Manager. To do this right click on the Flat File Connection Manager and click on the Properties option in the menu. This will open up the properties window for the connection manager. In the properties window click on the ellipse (… ) in the Expressions. This will open the Expression Editor for the connection manager. The following image shows this process.
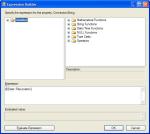
Select the Connection String Option in the Property of the Editor and click on the ellipse of the property. This will open up the Expression Builder to edit the property value. In the Expression Builder, drag and drop the variable FileLocation. Since the FileLocation variable contains the entire file path and file name of the destination file, the connection manager now will point to that location and file. The image below shows the expression builder for the connection manager.
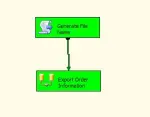
Click OK and go back to the Control Flow pane. This completes our SSIS package which will export the data from the AdventureWorks database to the text file which is named according our naming convention. Now execute the package by hitting F5. Now we see that the flat file with the required name is generated with the data populated from our AdventureWorks database. The following screen shot shows the successful execution of the SSIS package. Note that we changed the name of the Executables to some meaningful names rather than leaving them at default name what SSIS gives.
In this post we discussed the need of the data flow task and also looked at the configuration of the Flat File Destination and OLE DB Source. We also discussed the export of the data in the text file from the database by naming the text file dynamically based on the current date and time. In the upcoming posts we are going to look at the export of the data from any OLE DB source to other destinations like excel files.



Log Buffer #107: A Carnival of the Vanities for DBAs said
[…] for upgrading to SQL Server 2008. Good job Jason! And, finally, Decipher Information Systems has a fabulously detailed post on how to do a regular export of data using a SSIS […]
SSIS: Importing data from a text file using a package « Systems Engineering and RDBMS said
[…] SSIS: Exporting data to a text file using a package […]
janet said
Great article but one thing is missing — the one thing where I continue to meet failure. That is, moving the package to SSMS (I can do that) and getting it scheduled so that is executes successfully. I seem to be able to go through all of the steps just fine but have never gotten it to execute successfully from SSMS. And I can’t find any articles that make sense of it all.
Any instructions for that?
Thanks,
decipherinfosys said
Janet: We will write up a post on that and will put it on the blog very soon.
Ralph Wilson said
This looks good for those instances where you already know the names of the text files that are your targets. However, I am in the position of needing to output to textfiles (i.e. flat files) based upon names that are stored in a table in the database.
Basically, the situation is that I need to set up a means for letting someone else actually maintain the data in a table that controls some processing, one step of which is importing data to process and another step is exporting the processed data to a flat file. The user that maintains the data in the control table has to be able to specify whatever fully pathed file names (within reason of course) that they need to and then the process should handle it from there.
Since the manipulation of the data, once imported, can easily be done with a query, it would be really nice to be able to set up an SSIS package that handles the whole task rather than doing it in procedural code. However, for SSIS to do that, it is going to have to be able to import from and output data to files based on the filenames specified in rows in the control table.
janet said
Thank you. Can you tell me when that might be posted to the blog. I have very little hair left to pull out! Thank you!
MuthuKumar said
Hi,
Nice article, This is what I looked.
Thank you so much
Regards,
Muthu
Anonymous said
excellent!!
decipherinfosys said
Janet:
Two new posts have been made in the last two days which should help answer your questions…
decipherinfosys said
Ralph,
We will post a blog post on your scenario soon. We will post the link here when we do the post.
Arthi said
How to write the header and footer in the text file while
exporting data to a text file using a SSIS package.
The footer should contain the selected row count value.
Pawan said
Hi,
Did you solve the issue where the footer contains the row count value.
If yes how?
Your help is greatly appriciated.
mary malone said
I’m only having a problem when it come to Script editor. Where should I copy and paste the information
Kevin Murphy said
Great Job on this…This is very concisely presented and easy to understand.
Kevin
MikeG said
This worked perfectly for me, thanks! However, I’m wondering, what if my source has no data? How would one check for this and then prevent the creation of the flat file if there are no records?
Santhosh said
Good Article and is helpful.
Yurk said
Muchas pero muchisimas gracias, si no fuera por tu post no se que hubiera hecho… Idolo!!!
Saludos desde Perú … (1)
vamsi said
awesome !!
Arshad Kalam said
I was able to create an SSIS package and it also ran with no errors. But i want to create a Job for this SSI package. This job will run on daily basis. When I created a Job and on Step 1 I add my SSIS package and then try to run the job, it gave me error. Login failed for user sa, Although I specify password for the sa account and checked the ‘save my password’ option, it still didn’t work. Any idea??
indu said
love this article please tell me how i can become a member to this site thank you
decipherinfosys said
Hi Indu,
We are happy that you liked the article. In response to your question about membership – this is free content and you can subscribe to the feed in order to get automatic updates…
sathya said
Awesome job.
The only problem I had was the default editor was set to c#, and when I copy and paste the above code it did not work, later on I deleted the script task and created the new one with visual basic, it worked great.
Good Job.
Saved lot of time.
Chris Lee said
The article and related posts are great indeed. However, I believe a lot of people need help on deploying the package along with XML config file. So the package could work different environments (dev, QA and prod). I had seen packages run well on dev and qa (sadly QA is not prod like but more dev like env). Once it is production, issues like “connection was not valid”, folder permission, SQL Agent, 0xC001401E, 0xC0202070, “Th file name is a device ot contains invalid char…”. There are a lot article on setting config file. But more detail discussions are needed – like when to set connection string, value, EvaluateAsExpression (some suggest do so but others not),….
Chris
Trev said
Check out this for the header row question:
http://agilebi.com/cs/blogs/jwelch/archive/2008/02/08/adding-headers-and-footers-to-flat-files.aspx
E said
Perfect.
P said
Great article!!
But i want to create file only if there is data coming in the dataset…if rowcount is zero i dont want the blank file to be created.Can anyone help me.
Klaus said
Great article – this is exactly what I was looking for! Is there a way to create an additional empty text file after the data file is created that I can use as an indicator file that the data text file is ready to be further processed?
Sunil said
I have to create similar SSIS package in SQL Server 2008. Can I use the same or do i need to do any changes or is there any differences between SQL 2005 & 2008 versions.
Anonymous said
Great article, got me to what I needed to do without flaw. Thanks.
ahamed said
Very nice article… It helped me a lot.. Great thanks…
kshipra said
I can create the CSV file successfully but i got some junk data before every value in the data. Can you please help me on this?
Kishore said
Very nice Article. Good Job.
Ashok Pandey said
It only write the header row of the query…Please suggest
KK said
I have the same problem…
Andi said
Thank you very much. It works for me !
Anonymous said
in this where did we metion the path where the file has to be created?
Some favourites- Links | Microsoft BI Stack said
[…] & BI Links1SQLBI – Marco Russo Display the MDX query of an Excel 2007 PivotTablessis Exporting data to a text file using a package « Systems Engineering and RDBMSDW 2.0Bill Inmon defines DW 2.0 The Business Intelligence BlogExamsts Microsoft SQL Server 2008, […]
How To Fix Data Package Manager Download Error in Windows said
[…] SSIS: Exporting data to a text file using a package … – Jul 23, 2008 · On this blog, we have covered how to export data out from the database and different ways to import data into the database tables from different sources…. […]
gunti said
How can I add number to the name of the txt file ? For example:
CustomerOrders_YYYYMM01.txt , if the package ran for the first time. For second time I want the file output as CustomerOrders_YYYYMM02.txt, if third time, CustomerOrder_YYYYMM03.txt.
deep patel said
Dts.Variables(“User::FileLocation”).Value = Dts.Variables(“User::FileLocation”).Value.ToString + “\CustomerOrders_” + CStr(Format(Now(), “MMddyyyy_hhmmss”))
In this line i have an error
Unrecognized escape sequence………….
deep patel said
please give me a fast reply
thank you in advance
Anonymous said
Awesome Article! helped a ton 🙂
KK said
Hi, my sql query is ok but I don’t have data in my flat file (only the columns’ names). No output errors.. What could have gone wrong?
manoj said
Nice post , thanks